Finding images and adding a favicon is simple to do, but only when you know how! “Favicon” is another one of those words you’ll hear bandied about and wonder what on earth it means. A favicon is simply that small image you’ll see on a browser tab.![]()
Some webmasters don’t bother with this, but for me it’s one of those small things that adds the professional touch.
By now you’ll have an idea of your “brand”, for example, we’ve used a chick to represent our branding and use a chick image as you can see.
Finding an Image
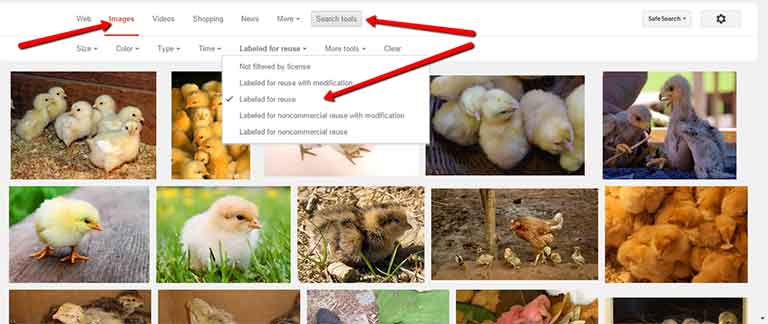
If you don’t already have an image you can search for royalty free images using a filtered Google search. Type into Google the type of image you’re looking for (we used “chicks”). Click on “Search Tools” then in the drop down on “not filtered by licence” choose “labeled for re-use”.
The British Library recently put 1.000,000 images into the public domain and made them free to re-use and re-mix. https://www.flickr.com/photos/britishlibrary
Here are some other good resources for finding royalty free images.
- https://clipartbest.com/
- https://www.goodfreephotos.com/
- https://www.lifeofpix.com/
- https://www.pexels.com/
- https://picography.co/
- https://publicdomainarchive.com/
- https://www.gratisography.com/
- https://nos.twnsnd.co/
- https://skitterphoto.com/
- https://pixabay.com/
- https://stocksnap.io/
- https://stokpic.com/
- https://www.canva.com/photos/
- Pikwizard.com
- Unsplash
- Stock.Xchng
- Flickr Commons :
Try and find an image that is square in shape, this will make it easier when resizing for a favicon.
Resize Your Favicon
Once you’ve found the image you want to use it’ll need to be re-sized. Favicons need to be very small, only 16px by 16px and there are a few ways you can do this.
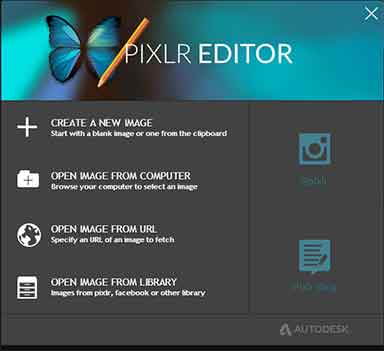
I’m going to show you how using Pixlr, a free online editing tool (no software installation needed). Firstly open this link to access pixlr.
There you’ll see 4 options, we are going to choose “Open Image from Computer”
This will bring up a window where you browse to the folder where you saved the image you found in your search, (we’ll also show these steps in the video).
Choose the image and it will open in the Pixlr editor.
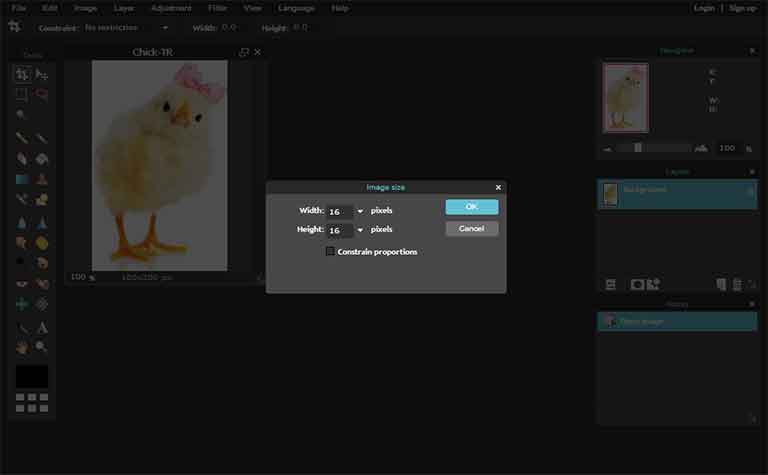
Click on “Image” then “Image Resize”.

Now you can put the dimensions you need for a favicon. This method works any time you need to resize an image. I’ve unchecked the box “constrain proportions” so I get a 16 x 16 square. This works with the chick image I chose, but some images will look out of proportion using this method, hence the need to find a square image.
Now go to “File” and “Save”, your Favicon is ready to use!
UPDATE – The latest update from WordPress (4.3) now lets you add a favicon without the need for a plugin, although you can still use a plugin if you wish! To use the new wordPress feature, go to Appearance – Customize – Site Identity. You’ll see “site icon” there and this is where you upload your image. Recommended size is 500px x 500px and you can use the training above to resize your image. The following video will walk you through the steps.
Adding Your Favicon
Some themes come with the option to upload your favicon, but you can use a plugin if your theme doesn’t have this. All in one Favicon by Arne Franken is simple to set up, just follow the tutorial for adding a new plugin.
Once the plugin is activated go to “settings” “all in one favicon”.

In the Frontend Settings choose “ICO Frontend:” then click on upload and browse to the image you save earlier. Scroll down and do the same in the Backend Settings.

Save all the changes!
That’s it, you should now have a nice image on your browser tab, you’ll also know how to find free images.
The following video will also take you through these steps.
Any questions? Please leave a comment below or contact us via the contact page.
Hi, very informative article.
Please also check out https://www.goodfreephotos.com for thousands of unique public domain photos, all high-resolution and free to use for any purpose.We specialize in photos by location as we document cities, national parks, state parks, national landmarks, and more. We update with 20+ photos each week. Appreciate it if you could add us to your list of sites.
Glad you enjoyed the article. I’ve added you to our list. 🙂